Using Sound Walls in Early Elementary Classrooms
Sound walls guide students to investigate phonemes and make informed choices when they’re unsure how to spell out a sound.
Your content has been saved!
Go to My Saved Content.
A colleague recently messaged us, “How and why should teachers use sound walls—and are they different from word walls?” We believe that both word walls and sound walls can be of value in the classroom, but there are distinct differences between the two.
Word walls, a print-to-speech tool, are organized by a word’s initial letter. This can get tricky when you have a word like knot, which begins with the letter K and the sound N. That’s where the sound wall comes into play, helping students spell words by listening to the phonemes, or the smallest unit of sound in speech in a word.
Sound walls are speech-to-print tools used to categorize phonemes. The word cat, for example, has three phonemes, c/a/t. In the English language, we identify about 44 phonemes using the 26 letters of the alphabet. In many ways, grasping the sounds of the 44 phonemes is like cracking a code for our early learners. Sound walls allow students to investigate sounds and eventually learn high-frequency words.
Some common materials for sound walls include mouth articulation cards, phoneme group labels, sound cards for phonemes, and sound spelling cards with power bar. For instance, the power bar is a visual cue to show how often the particular spelling of the sound is used. The sound /k/ has three different spelling patterns: “c,” “k,” and “ck.” The power bar cards give clues to show students how often a certain spelling pattern is used in words. This way, students can make more informed spelling choices when they’re unsure about how to spell out a sound.
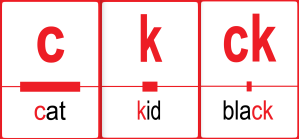
Here, the “c” spelling has the largest bar, so this is the spelling most often used for the /k/ sound.
Organizing the Wall
Creating the sound wall before school begins can help teachers consider exactly where each new sound should be positioned. Arranging common sound patterns, mouth position cards, and power bar cards together creates organization.
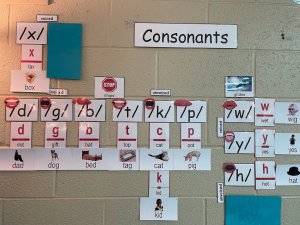
When setting up the sound wall, arrange consonants on the left and the vowels on the right. The consonants are organized according to the type of sound/phoneme (stops, fricatives, affricates, glides, liquids, and nasals) and if the sound is voiced or unvoiced. The vowels are organized in a V shape called the vowel valley. The vowel valley on your classroom wall will show how the mouth looks and feels as each vowel sound is vocalized. At the top of the valley, the mouth is mostly closed, and slowly, as you descend in the valley, the mouth opens.
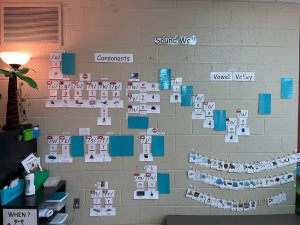
Once the sound wall is organized and affixed to your classroom wall, cover each sound with a piece of paper (in the image above, blue paper was used). When sounds that have not been taught are concealed, the wall is initially a mystery to students. Each day, review the sounds already introduced, and reveal a new sound by removing the blue paper. Finally, if appropriate, add the sound card. The sound card is an image and matching word serving as the example for the phoneme.
Depending on the grade, sound walls may look and progress differently. In kindergarten, for example, not all sound patterns are introduced, so the wall may not be completely uncovered at the end of the year.
In my (Danielle’s) kindergarten classroom, the following five steps help me support my students:
1. Review: Reviewing all previously learned sounds and reciting a chant for each sound: /d/, /d/, /d/, /d/ as in dog (the word being the sound example for that pattern).
2. Practice: Practice the new sound for the day, focusing on mouth and tongue positions. We use small mirrors when possible to observe our mouths.
3. Notice: Notice if the chin drops to determine whether the sound is a consonant or a vowel. Ask students to place the top of their hand flat under their chin to feel the drop. Query students, “Did you feel your chin drop? Does the sound belong in our vowel valley?”
4. Explore: Explore the new sound. Practice singing the sound together. Can the sound be held out, or does it stop? Query students, “Can you hold the sound out like a musical note?”
5. Determine: Determine if the sound is voiced or unvoiced by feeling for vibrations in the throat. Ask students to place their entire hand lightly around their neck. Then, make the sound and feel for vibrations, and ask them, “Can you feel the vibration?”
Spicing Up the Sound Wall
If you’re looking to add some color to your basic sound wall configuration, consider taking photos of your students’ mouths making the stops, nasals, fricatives (and so on) and post their mouth images on classroom walls or on your classroom digital portfolio. Students can then use these images to make individual mini-books for future reference; and if they have access to iPads, the Book Creator app works nicely for this purpose. Teachers can even generate QR codes on each sound and capture video of student mouth positions with sound. Now students can use the QR code to verify sounds and mouth positions.
To ensure that students retain the sounds they’ve learned, here are a few tips to incorporate sound wall learning into the existing school schedule:
- Highlight use of the sounds; continually refer to the wall throughout the day and not just during the literacy block.
- When teachers notice that students have mastered a sound, it can be uplifting to let students teach their peers about the sounds they’re familiar with—for example, saying “Wow, Oliver and Samhar both have the “oo” sound; if you need help, ask Oliver or Samhar.”
- Set up mirrors in front of the sound wall to get students to practice the sounds as part of their daily routine.
- Add a lowered table or floor space under the sound wall where students can freely sit while writing. They can use the wall for referencing sound card words, self-checking spellings, and practicing sounding out to support independent writing.