How Green Screens Bring Learning to Life
A simple video production technique can animate a wide range of student projects—and instill new energy in distance learning.
Your content has been saved!
Go to My Saved Content.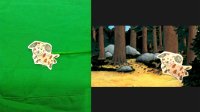
Teaching has always been as much about what we do as how we do it. It’s about asking the right questions, using the right tools, and igniting students’ curiosity to engage with content—even when we’re not in the same physical space. Although much has changed in education over these last few months, students’ curiosity and wonder have not. So it may be necessary, now more than ever, to embrace technology as a way of tapping into student interest.
My 15 years as an educator have taught me that a multimodal approach to learning—that is, working with different forms of media and with a number of senses—is one of the best ways to differentiate, build knowledge, and inspire creativity. Additionally, a multimodal approach has been shown to sharpen memory and improve attention to difficult tasks.
Forms of technology that do more than just replace pencil-and-paper tasks are a great way to incorporate multimodal learning. In my own classroom, green screens—a video production technique in which two or more video or image streams are layered together—have helped me embed opportunities for students to create and reflect on learning.
In remote learning, teachers no longer have hallways to display the work of students. Without a real audience for work, assignments can feel insignificant and students can feel unmotivated. Green screens offer opportunities for expressive, process-oriented work that can be shared as a class and with families.
Getting Started
There are a few things you’ll need to work with green screens, starting with a green backdrop of some sort. You can use a large roll of green paper or a green bedsheet, paint a section of wall green, or purchase a green screen. For individual small projects, I’ve even used a green towel, a T-shirt, or sheets of green 8.5 x 11 paper.
You’ll also need:
- A device to record the video and/or images. A tablet or smartphone will do.
- A green screen application. I have tried dozens and recommend these two apps: Chromavid and Green Screen by Do Ink.
To get started, download or capture a landscape photo (from life, books, the internet, or a hand-drawn image). Next, select a photo to use as the base layer. Then record your video.
Techniques for Using Green Screens
Green screen with downloaded still image background: I began using a green screen by playing with simple backgrounds. Students wrote stories or poems, selected backgrounds, and then presented their work in front of the screen. This small step worked magic for engagement.
Green screen with self-created still image background: Math journaling was always something that my students endured rather than enjoyed—until we used the green screen. At a green screen journal station, my students were able to respond to fictional characters from their math textbook.
To create these custom backgrounds, I use Microsoft Word or Google Docs and build fictional characters or real people into the images. Next, I take a screenshot in landscape mode. Last, I tap the plus sign and use the original image as my base layer.
Green screen with a moving background: As time went on, our comfort grew with this technology, and we started to utilize video, rather than still images, as a background. Students enjoyed the opportunities to respond to and interact with the videos.
For example, in one video students “became” National Geographic reporters in different locations throughout North America. Once they had completed certain research steps pertaining to their geographic location, groups selected a video to use as their promotional video backdrop and wrote a script.
Green screen with a student-created background: During Writer’s Workshop, students wanted to promote their original stories with book trailers to feature their characters and other important story details. To do this, they drew the setting of their book on an 8.5 x 11 piece of paper and took a photo of this drawing. The photo became the base layer. Next, they individually drew and cut out the characters of their stories. The story characters were mounted on green strips of cardboard (which were folded for added strength).
Every time our class used this educational tool, I was impressed with students’ work. The process motivated students to do their best: Students often rerecorded their videos multiple times, working to fluently read or emphasize certain words.
If you’ve ever seen students lose track of time when devoting themselves to a task or express delight at the sight of their own finished work, you know why green screens are a staple in my classroom. It wasn’t just one assignment that made the work so memorable. It was the result of an engaging process merging with important work—and the promise of a real audience—that has made using a green screen such a success.