3 Unique, Versatile Seating Arrangements
These popular, teacher-tested desk configurations make it easier to shift between independent work, collaboration, and whole-class instruction.
Your content has been saved!
Go to My Saved Content.At the beginning of every school year, teachers become interior designers. They decide what to hang on the walls and how to organize supplies like pencils, binders, and glue sticks. But perhaps no design choice matters more than where students sit.
“It’s crucial that we as educators remember that the same level of thought and intentionality that goes into building relationships, lesson construction, and tools for assessment also goes into how we arrange our seating and our students within that seating,” writes former high school teacher Jay Schauer.
With dozens of designs to choose from—from rows to clusters to circles—finding the right fit can feel like assembling a puzzle with pieces from different sets.
But veteran teachers will tell you that seating is never one-size-fits-all. The best setup reflects both your physical space and your instructional goals, including how you want students to learn and interact.
In recent years, three distinctive, teacher-tested arrangements have taken off among our readers: Schauer’s L-shaped desks, former ELA teacher Tyler Rablin’s unconventional double horseshoe, and middle school math teacher Kathy Kansky’s groups of three. Each has distinct strengths and is suited to different activities, from group work to independent reflection. Here are key insights from each that you can adapt to your classroom.
FIXED DESKS THAT SUPPORT SMALL, QUICK SHIFTS
Whether students are conducting independent work, completing small-group assignments, or listening to instructions as a whole group, designing a seating plan with room for “quick physical transitions [helps] students also transition mentally to each activity,” writes Rablin.
For many teachers—especially those with many students and little space—it can be challenging to find space to accommodate these different modes of instruction. Rablin works around the constraints of a tight room with an unconventional setup: a double horseshoe with tables in between.
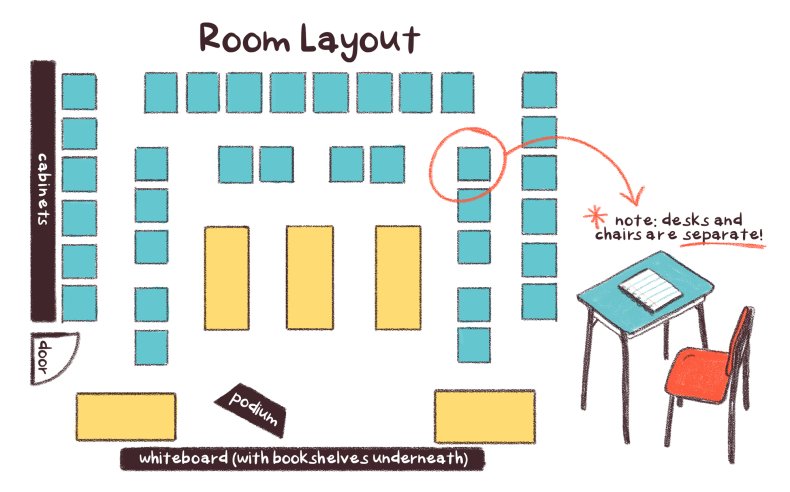
In Rablin’s diagram, blue squares represent individual desks, and yellow squares represent larger tables where kids convene for group work or whole-group instruction. To avoid wasting time moving furniture—and enduring the screech of desks—students learn to pivot their chairs instead.
For assessments or independent reflection, students move to the outer blue desks and face away from the whiteboard, toward the room’s three outer walls. When the class comes together to watch a presentation or video, students gather around the inner yellow and blue tables. For small-group work, they convene at different spots around the room.
The strength of this setup is the ease of movement: Students never have to travel more than a few steps to shift between independent or group work. Gaps between the inner desks also allow them to move fluidly around the room. “When the room is set up [like this],” writes teacher Amaiya H in the comments of Rablin’s piece, instruction is much “smoother.”
Many teachers won’t have enough room to adopt the arrangement as is, but educators have found creative ways to adapt. If your chairs are attached to the desks, middle school teacher Laura Bradley recommends having students rotate their entire desks and rehearse the movement through a game she calls Desk Olympics. Classes compete for speed and silence, and “with plenty of Olympic training, my 8th graders got very good at it,” she says.
BALANCE COLLABORATION AND ATTENTION WITH L-SHAPED DESKS
If you want to encourage both small-group and whole-class interaction, L-shaped desks might be your best bet.
Each grouping consists of four desks arranged in the shape of an L, with two forming the vertical line and two forming the horizontal line. Here’s a diagram Schauer created, along with a picture from his classroom:
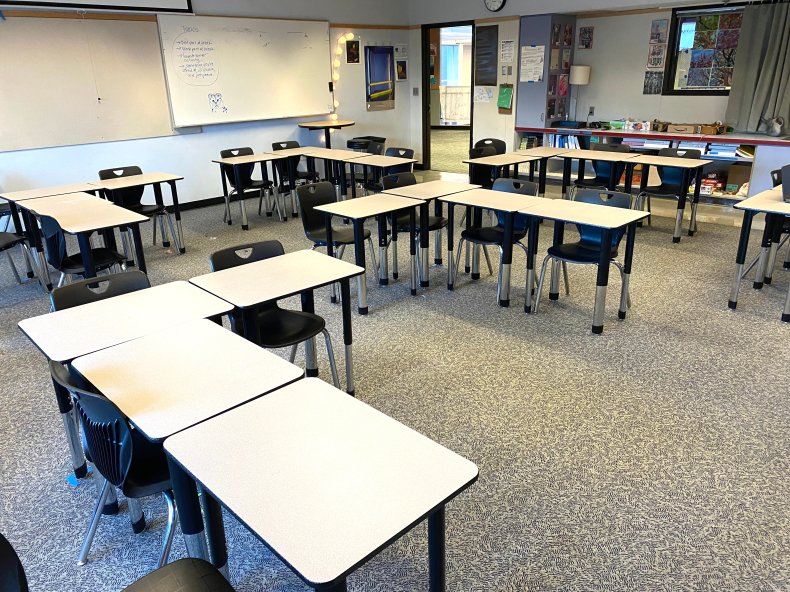
In this layout, students have a clear view of the board, helping them maintain their attention to the front of the room. The arrangement also makes it easy to shift into small-group work: Without leaving their seats, students can turn toward a neighbor or someone just a few inches away.
L-shaped groups also allow Schauer to create strategic combinations of learners. For example, he positions students who have struggled academically between two academically successful students. “It’s time-consuming at the front end,” says Schauer, but instead of reteaching and repeating instructions as the teacher, “you could hear all the evidence of students teaching each other.”
Assigning students with similar skills and strengths to the same position within each L also makes it easy to reshuffle groups for brainstorming or cross-pollinating ideas—which comes in handy during jigsaws and team quizzes. High school math teacher Kaleb McKern says the configuration also helps him work with several students at once: “[I] can stand in one spot and help the entire L at the same time,” he commented.
TRY GROUP WORK WITH SEATING TRIOS
According to the Latin maxim Omne trium perfectum, everything that comes in threes is perfect. No seating plan is perfect, exactly, but groups of threes come close, says Kansky.
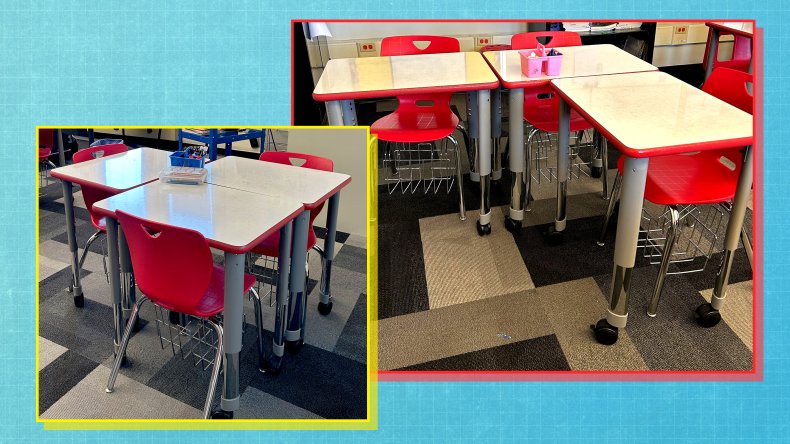
Trios strike a sweet spot, feeling “intimate without being isolating,” Kansky argues. At a table with three students, for example, it’s easy to turn and talk to a neighbor. They also give teachers plenty of room to circulate, pull up a chair, “see everyone’s work, provide targeted instruction, and comfortably engage with students.”
Despite their small size, research shows triads are large enough to accommodate multiple perspectives, too, leading to varied discussions about how to solve a problem or complete a task—without overwhelming students with competing ideas.
The arrangement also creates easy teams for group work. Whether they’re working on one of the whiteboards on Kansky’s walls or going on a gallery walk together, the “groupings feel natural,” because students are “accustomed to working in this group size,” she writes.
BEST PRACTICES TO KEEP IN MIND
Reconfiguring desks alone won’t create the classroom dynamics you desire. Regardless of the layout, teachers recommend explaining to students how the configuration is meant to work—and why it matters. Here are a few best practices to keep in mind when trying out a new arrangement.
Circulate: A new desk layout may make it easier to monitor from afar, but proximity still matters, Kansky writes. The best way to connect and remain close to students—and monitor whether or not a seating arrangement is working as intended—is to move around the room often.
Practice Transitions: Without a clear structure, transitions between groups can descend into chaos. Have students practice which tables and seats to migrate to during a specific activity, such as a jigsaw or small-group discussions. Practice specific movements, too: If you’re incorporating Rablin’s horseshoe setup, for example, students should rehearse swiveling their chairs quickly and quietly.
Use Movement Cues: With enough practice, short phrases like “Move into your quads,” “Conference setup,” or “Project groups,” can help trigger short transitions without fuss, according to educational leader Matt Pitman.
Adopt, Adapt, and Modify: Depending on your furniture, available space, and class size, none of these setups may fit your classroom perfectly. But small modifications can make them work. Even if you can’t pull off L-shaped desks, for example, Schauer says you can “still think strategically” about where students sit and apply the “intentions and reasoning” behind his design.