Self-Paced Learning in the Early Elementary Grades
Blended, self-paced learning might seem out of reach in kindergarten, but it can work—and it doesn’t require an inappropriate amount of screen time.
Your content has been saved!
Go to My Saved Content.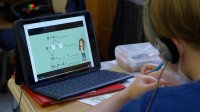
I was introduced to blended, self-paced learning when my school district hosted Kareem Farah, founder of the Modern Classrooms Project, for a two-day intensive training and professional development opportunity. I left the session with the framework for shifting my classroom to a self-paced environment that gave my kindergarten students, at 5 and 6 years old, the freedom to take ownership of their learning.
Two years later, I continue to consistently work to improve my implementation of the model, and I’ve learned some valuable lessons along the way.
Entrusting young students with such freedom and responsibility can seem overwhelming, and there’s also concern about the amount of screen time that students have each day. The beauty with this instructional model, however, is that you, as the designer of each lesson and unit, are in control of just how much time your students spend in front of their screens.
Working With K–2
For primary grade students, the Modern Classrooms Project suggests keeping instructional videos as short as possible—5 to 7 minutes is the sweet spot. Aside from the videos, I design each lesson so the learning activities that support the instruction and allow the students to practice the skill or content are completely screen free. With young learners, this is somewhat more challenging, as many may be unable to read written directions, requiring some creative planning—using an organization system that relies heavily on color coding and pictorial symbols, for example—to ensure that they can access and complete activities (mostly) independently. It is, however, absolutely possible.
The instructional videos have embedded questions or are coupled with guided notes so that students aren’t simply staring at a screen; they’re deeply engaged in the learning. My students view each video while completing a set of guided notes. I often tell them to pause their instructional video to attempt to solve the problems on their own and then check their work when they resume the video. Rather than passively viewing instruction (which often happens using more traditional instructional techniques), students are active in the learning process.
It’s also advisable to utilize the instructional videos to prompt students. For example, when I want my students to interact with their guided notes, I’ll say within the video itself, “Pause your video now and _____ on your guided notes, then press play.” For most students, this will be their first interaction with note-taking, and they absolutely will need a prompt to do this successfully and in a way that’s meaningful to their learning.
The end of the instructional video is also a perfect time to remind your students what comes next. I frequently say something like, “Look back on your learning road map to see how you can continue to practice this new skill.” This is also a good time to go over directions or model for students how to complete the first question in the next activity that they’ll be required to complete, especially if you’re trying to choose screen-free supporting learning activities.
Guided Notes by Design
Guided notes can be as complicated or as simple as you’d like—you’re the creator. For learners in kindergarten through second grade, I recommend focusing heavily on fill-in-the-blank style notes. I also create matching activities or ask students to circle the correct item. Though many people immediately imagine tedious note-taking when they think of guided notes, the sky’s the limit in terms of how you design the notes to work for your learners.
The self-facing progress trackers that I design even today as a second-grade teacher are vibrant, colorful road maps that are reminiscent of a classic board game such as Candy Land. Students begin at the designated “Start Here” space on their road map and progress through each unit, completing one lesson block at a time and, within each lesson block, one learning activity at a time. Each activity has its own square. Activities within the same lesson are color coded with the same background color. Icons pictorially communicate to students which type of learning activity they should be working on.
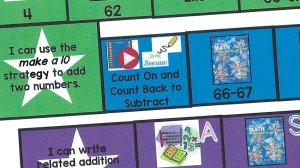
For example, when it’s time to watch a lesson video, my students will see a familiar video icon on their road map as well as the Seesaw logo (Seesaw is our learning management system). Students will also see an image of a pencil. They know this means that they’re required to complete a set of guided notes as they watch the video. When my students see a large white star on their road map, they understand that this means “mastery check” and they must see me to obtain their copy of the assignment that will allow them to demonstrate that they have mastered the skill.
The same icons are used around the room to label where students can find the materials for the learning activity. The hanging file folder that houses the guided notes for each unit in my classroom has a label with that same pencil image, and each pocket is labeled with a different color to correspond to each lesson block. Navigating the storage system is easy for young learners in the primary grades.
The same type of organization is consistent throughout the unit for learning centers and practice pages in student workbooks, too. There are corresponding images or an image of the student workbook on the learning road map and numbers on the drawers in the central storage area to help communicate which workbook pages students should complete.
Another key to successful implementation is to rely heavily on modeling early on during implementation. Elementary school teachers understand the absolute necessity of diligent modeling early in the school year. We model everything from expectations for arrival and morning work to expectations for dismissal procedures, and implementation of a blended learning instructional approach is no different.
To model the instructional approach, I work through at least one or two entire lessons from the first unit with my class. I project and play that first lesson video with my students and pause the video to model for them how to interact with their guided notes and how to follow the prompts within the video, as well as how and where to find learning materials.
Consistency is key. Maintain the same organizational system as much as possible. Organize and set up units so that they follow a similar pattern. It’s especially helpful for young learners to be able to anticipate what to expect, work-wise, within a lesson or a unit. Use the same color coding, icons, and symbols in each unit. Students will quickly develop a familiarity with your organization and labeling, and that familiarity will ultimately drive independent navigation and self-paced learning in your classroom.