Making Hands-On Science Work in Elementary School
With a few systems in place, active science experiences can be fun and meaningful for both students and teachers.
Your content has been saved!
Go to My Saved Content.
When I was a student, science was my least favorite subject because I thought it was just memorizing random facts. As a teacher, I want to show students that it’s not about memorizing information, but about asking questions regarding the world around you and investigating to find the answers.
When I first started teaching elementary science, I stuck to the textbook and videos I could find online. It felt impossible to plan hands-on activities for my 24 students and fit everything into our 30-minute science block, even if I desperately wanted them to have active learning experiences. Students moving around the room with science material can feel chaotic. I learned that with a few systems in place, these experiences can be fun and meaningful for both students and teachers. Incorporating hands-on activities in the elementary science classroom can help learning feel worthwhile and memorable.
Creating a Classroom Culture of Hands-on Science
Generally, my students come to me already interested in science. They’re excited and ready to dive into learning, but hands-on experiences can quickly become messy and frustrating. To prevent this, I set and consistently review the expectations I have for students and materials. I remind them that I reuse materials year after year, and I model how each activity should be done.
Before we start, I go over directions, but I also make sure they have directions in front of them, either in their notebook or on a printed sheet in a page protector. For each activity, I set a timer on the board, typically using Classroomscreen. To maintain excitement throughout the year, I encourage students to come up with their own activities that we can incorporate in class, which also helps them be realistic about the materials we use. For many of my students who have struggled in other academic areas, science has become a time that they can thrive and embrace their natural curiosity through hands-on learning.
Organization of Materials
Acquiring supplies: It can be challenging to have all of the materials you need. To get materials, I utilize a community giving group on social media; create and share an Amazon wish list; and if a teacher is moving or retiring, I ask if they have anything I could use. We study parts of plants, and I reuse the same fake plants that someone was giving away years ago. A painting event at my local library had extra materials, and I was able to take home a nearly complete class set of small wood slices so we could learn about tree rings.
I also reuse materials whenever possible. For example, when we use cups and spoons, I rinse them and put them in a separate cabinet away from those that are clean and unused. I also keep some ingredients like spices from my kitchen after they’ve expired to use when we learn about mixtures and solutions.
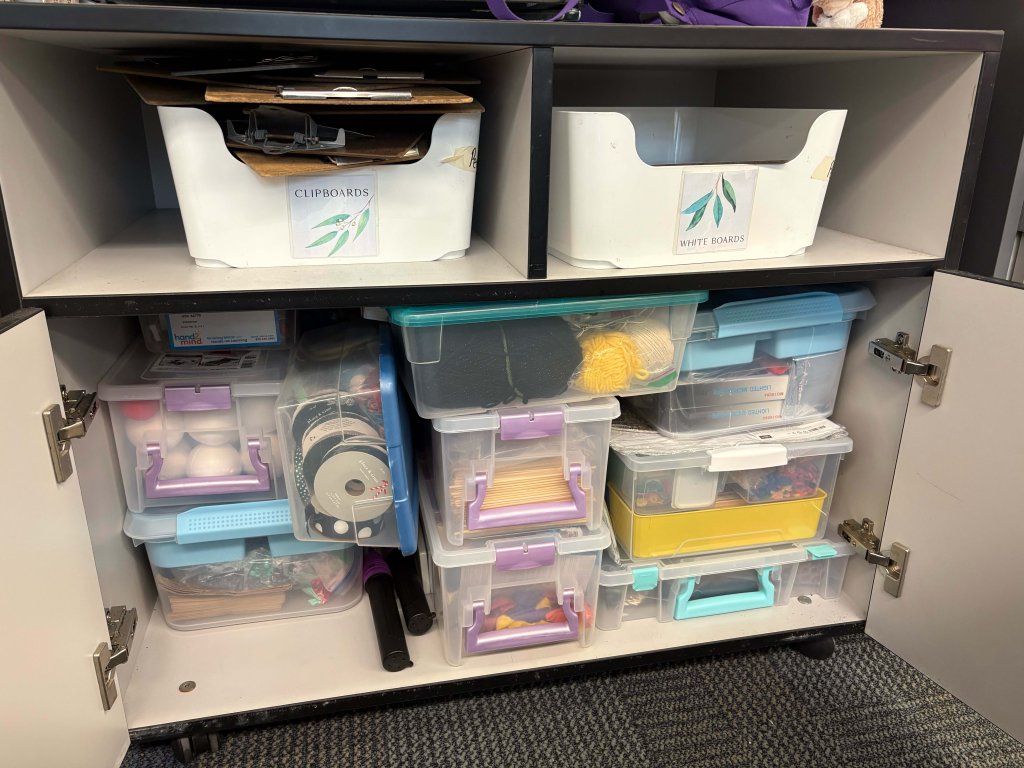
Supply cabinet: As I accumulate supplies, an important part of keeping this system working is organizing the materials in my classroom cabinet. If they don’t get put back nicely, I’m much less likely to use them. Luckily, I typically have students who love to help with this task. Sometimes I group similar materials together, like pipe cleaners, craft sticks, and string, while other times I’ll put all necessary materials for an activity in a bin to use year after year.
Classroom organization: When I first began incorporating hands-on activities, I put everything we needed that day on the only available table in my room—but I also needed that table for my reading small groups. If we were doing science that required extra materials, I just wasn’t doing small groups that day. There had to be a better way.
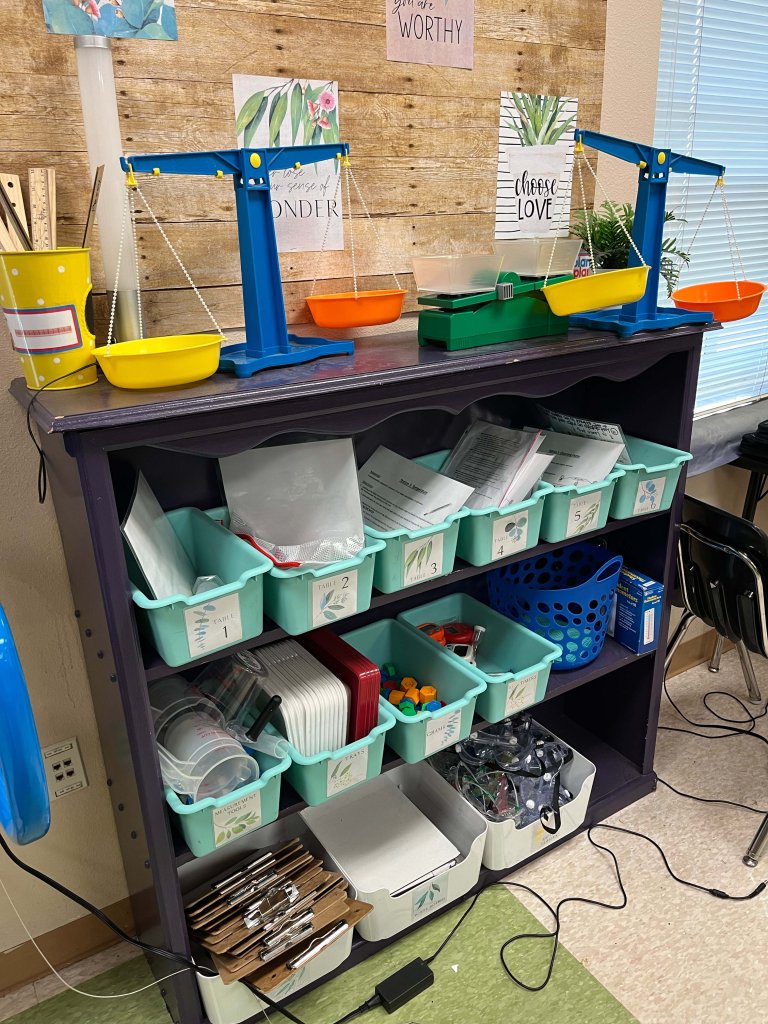
I redesigned my system and designated one shelf of my bookshelf to hold six bins. Each bin holds the materials for each table group. Using these bins helps me organize materials before an activity and takes away the stress of having to gather materials and put them away immediately. I can also include all necessary supplies and directions for each group so that transitioning into the activity takes very little time. If colleagues want to do the same activity, these bins are ready for sharing as well. This solution seems simple, but it completely changed how I do science.
Student materials: Throughout my science block, we use our science notebook. Typically we start by reviewing what we did the previous day or answering a question using our background knowledge. On days with hands-on experiences, we always have a recording sheet to use as we’re working. This could be for data collection if we’re doing an experiment, written or drawn observations, or reflecting on learning as we’re doing a task. At the end of the experience, we reflect, make connections to what we’ve already learned, and write questions we still have.
Organization of Students
I have three basic systems to guide hands-on activities: Students move, materials move, and demonstrations.
When students move, the materials stay on the tables and students rotate around the room. This is very helpful when the materials could get messy. In one activity, we separate materials based on their properties, and one station involves water and another involves sand. The water is much less likely to spill if the students move instead of the bowl, and this keeps the sand contained to one corner of the room.
When materials move, either we pass bins to different table groups, or I walk around to distribute materials as needed. In one activity, groups stir different materials into water to determine if they will dissolve. While students are working, I walk around with a pitcher to replenish water and to dump out mixtures as needed. This system is particularly helpful when I have larger groups or my students want to rush around from one table to the next.
When I do demonstrations, it is because I don’t have enough materials for each group, more teacher direction is needed, or we have behavior challenges that make the other methods more difficult. During the demonstration, I call on student helpers to come up and assist with the activity, and I pick students who are making responsible choices. This keeps students engaged and, typically, eager to participate. I only use this method when absolutely necessary, because if students are struggling with hands-on activities, that shows me they need more practice, not less. They have to be given a chance to learn and practice the procedures for a successful scientific investigation.
Sometimes I think an experience would be worthwhile, but it does not seem doable in the classroom because of safety, availability of materials, or student behavior. When this happens, I try to find a simulation online.
The most important thing to remember is that if given the opportunity, students could absolutely surprise you. For some of them, this is where they can truly show you enthusiasm and expertise in a way they previously have not. With these systems in place, I feel so much more confident in the quality of my science instruction, and I’ve seen students shine in totally unique ways.