A Content-Rich Maker Project
Students crafting cardboard suits of armor work on literacy, math, and collaboration skills.
Your content has been saved!
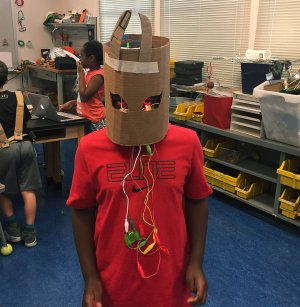
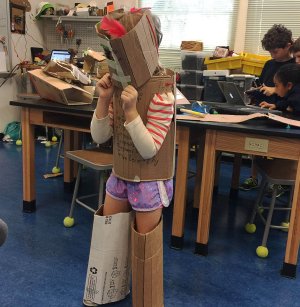
Go to My Saved Content.My job as a makerspace teacher is to create learning experiences that apply what my awesome third-grade students are learning in other classes and help them develop collaboration skills and unleash their creativity. I recently had them create cardboard armor, a learning experience designed to meet the students’ needs to work more thoughtfully and to learn to listen to the ideas of others.

There are plenty of examples of cardboard armor on YouTube. I had rejected this idea time and again because these armor builds always end in epic battles—and I didn’t want an epic battle in my classroom. I finally gave in when I realized how much high-level group work a project like this could support. By developing the research and planning, I was able to capitalize on the engagement generated by building suits of armor. And in the end I avoided the epic battle.
My classes are 90 minutes, and this project spanned four classes. Our main areas of learning were informational reading and writing, measurement and unit conversion, group work communication, and character education.
Group work in special classes like makerspace, music, and art can be really tricky. I enlisted the classroom teachers to help me set up the working groups for this project. We also talked about my goals for the kids in their groups.
Setting Goals
I really want to help the kids get better at group decision making, and the teachers suggested I add more decisions, especially low-stakes ones, to the process. On day one, as they were researching armor designs, each team had to decide on team colors, a team name, and a team motto, and then combine these elements into a team flag. These low-stakes decisions gave the students many chances to practice making decisions and resolving differences.
My best maker lessons are always literacy-rich experiences. In this case, the students started in the library working with our librarian to research ancient armor designs. Each team read through books they chose out of a giant assortment that had something to do with armor. Groups used Google Slides to build a “look book” of inspirations for their armor designs.
Each group had to make a suit of armor that would fit someone in their group. This was a difficult decision for some groups, but it became easier when I clarified that no one would be taking the armor home. Very few of the final suits would tolerate being worn, but at the beginning of the project every student hoped to own whatever would be made. I tried to help them get excited about owning the skills instead. Once they selected a model, there was a great deal of math involved in designing the armor for a particular person. They needed to figure out how much area they were covering. How much cardboard would they need? I didn’t let them bring in their own cardboard because I wanted them to have to calculate their material needs, not just guess.
I wouldn’t let them cut any cardboard until they had a plan or a pattern. I gave each group a large piece of craft paper, several rulers, a meter stick, string, and a tape measure.

When I did give them cardboard, I gave them long thin rectangles—I cut down all the boxes into strips so the kids would have to build and design something. This was inspired by science and design educator Rebecca Hare, who has said, “If you give a kid a box, they will create box-shaped things.”
How many strips do you need to connect to make a chest piece? How long do the greaves need to be? How can you protect an elbow? The problems and challenges are real, tangible. I kept the materials simple—cardboard and yarn. On rare occasions we used tape, but I preferred to punch holes through the cardboard and use yarn to tie pieces together. We didn’t use glue because yarn is much closer to the rawhide straps originally used to hold ancient armor together.
If you need this learning experience to empathize more math, have the students scale the patterns the pieces they create, first modeling them small and then enlarging them. In designing patterns, they have to get the dimensions and angles right. You could also focus on unit conversion and have them make their measurements in inches, but give them materials in centimeters.
Character Counts
The theme of our cardboard armor build was “Character Counts.” Each team’s suit of armor needed to support the school’s character education program. The students discussed how a suit of armor can support the concepts of trustworthiness and respect. Can a battle helmet communicate the idea of fairness? How can a design communicate the value of citizenship and responsibility?
Instead of an epic battle, we had a fashion show. When we were done, the teams shared their designs with the class and explained how their armor supported our school’s points of pride. It went well, and next year this will be a school-wide event.
