How to Spend Less Time Grading
Carefully deciding what to grade and providing students with rubrics can make grading less time-consuming.
Your content has been saved!
Go to My Saved Content.
A few years ago, it wasn’t unusual for me to be up working at 10 o’clock at night. I’ve never been so busy in my whole life. What was taking up so much of my time? Grading.
I know that good-quality grading has the power to really make a difference to my students. I’ve read John Hattie’s research in Visual Learning—it’s all there in black and white. Good feedback can affect student progress more than factors such as socioeconomic background, behavioral interventions, or even prior achievement. My students deserve excellent feedback.
Yet grading was invading all of my free time. I was grading even when I wasn’t because the grading guilt was there all the time. Fast-forward to today. I’ve made it my life’s work to give my students the best possible education I can provide for them, but now I have my own family and far fewer hours to spare. So I’ve had to become very clever with giving feedback. I want to share a few tricks that may help save you hours a week, while still preserving the high standards you want for your work.
4 Tips to Help You Cut Your Grading Time Dramatically
1. Plan for less grading: I always say to my staff, “If a student writes it down, it needs to be marked—it just doesn’t have to be marked by you.” When you plan your lessons, consider the ratio of activities that require teacher assessment.
I organize my teaching in stages following Barak Rosenshine’s principles of instruction: explanation and modeling, then guided practice, and finally independent practice. All the practice, apart from the last stage of independent practice, is assessed by using mainly closed questions. By the time students produce answers to open-ended questions, they have had masses of practice, and there’s little to correct, making grading go by much quicker.
2. Grade less: When planning my lessons, in order to decide if something is worth grading, I think about impact and alternatives.
In terms of impact, will student learning be transformed by my grading this? Will I have time in the next lesson to allow students to reflect deeply on my feedback? Will I make them produce something that proves that they have learned from it? If the piece is marked for any reason other than impact, then it needs to be replaced by a different activity.
When time is tight, I think about alternatives. How can I check that students have learned a concept? Will a multiple-choice exercise do? Can I create a self-marked form that I can then recycle with other classes? Can I provide students with the answers and then give them time to reflect on how their answers could be improved?
3. Unleash the power of rubrics or feedback sheets: One of my all-time time-saving favorites is my feedback sheet. It includes the criteria needed for earning each letter grade. To be more efficient, I use the same rubric for all of my students for every topic. Every year, I provide all of my classes with a student-friendly visual version of this sheet and go over what it means. I also model for my students how to use the sheet to grade an essay. The rubric is attached to every assessment, and I use it to grade every open-ended (usually essay) question.
Ask your students to use the rubric on their work before they submit it to you. Quality will improve, and the number of corrections will fall.
4. Speed up your grading: When it comes down to it, we can only reduce grading workload. We can’t eliminate it, nor should we. So how can we deliver maximum feedback with minimum effort?
The answer lies in training our students to turn a few visual cues into full-feedback messages.
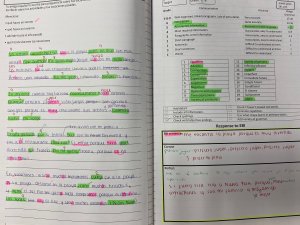
These are the cues I use:
- If a student writes something that impresses me or goes beyond expectations, I highlight it in green.
- If a student meets the criteria for a grade, I highlight that part of the criteria using a green highlighter.
- If there is an error, I highlight it in pink.
- If a key part of the criteria hasn’t been met, I highlight it in pink.
- In a section called Even-Better-If (EBI), students complete a short (closed-ended, self-marked) task that matches the kind of errors they have made. This task is linked to the part of the criteria that I highlighted in pink.
- In a section called Correct, I write a word that students have misspelled in the text, and they need to copy it out three times.
- In a section called Perfect, students complete a short, open-ended task that will prove to me that they have taken in my feedback.