Lesson 4: How to Make Blueprints on Presentation Boards
Revisit orthographic drawings by teaching students how to create and present plans for their golf holes.
Download Lesson 4 (68KB)
Lesson Objectives and Materials
Objectives
- To incorporate feedback
- To use geometry and critical-thinking skills to design playable holes
- To use orthographic drawings to represent the design
Materials
- presentation boards (11 by 14 inches or 20 by 30 inches)
- rulers
- graph paper
- measuring sticks
- pens and pencils
Engaging Students
Get your students interested in the lesson by doing the following:
- Ask them about what they’ve learned so far, such as perspective drawing and other key concepts.
- Have them demonstrate specific skills or lessons on the chalkboard. For example, ask your students to draw a golf hole in 3-D perspective.
Project Application: Creating Presentation Boards
Teach students how to create three or more different perspectives of their holes on presentation boards. Review some orthographic and perspective-drawing techniques first, then dig into the drawings.
Follow these steps to get your students underway:
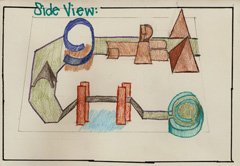
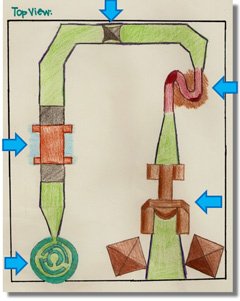
- Review orthographic drawings and plan, side, and front views. (See lesson 1.) Ask students to practice drawing their holes in these three views on graph paper.
- Review some important geometry techniques and definitions so that students can label their drawings correctly. For example, go over perimeters, angles, and area.
- Discuss the characteristics of presentation boards. Presentation boards can include
- A brief, informative title in large letters, if handwritten, or in a large font, such as 24-point, if done on a computer
- The same object (in this case, the golf hole) in plan, front, and side views, with each view labeled
- A border around each view
- Measurements of each part of the hole as they’d actually appear
- A sense of composition (balance and the effective use of white space) and color/contrast (for advanced students)
Ask students to review each other’s drawings and provide feedback based on the following questions:
- What do you like most about the design?
- Is the model well built? Is the design clear and realistic?
- Is the hole challenging? Too challenging? Would you have fun playing the hole?
- Do you think it is possible to build this hole and play it in the designated area (such as in the gymnasium or classroom)?
- What areas do you think need improvement? You can base your suggestions on the questions above.
- Ask students to incorporate any suggestions by redesigning their boards or by integrating critiques into the next stage of the lesson.
Student Assessment
At the end of this lesson, you should have a good idea of each student’s ability to create orthographic drawings, apply geometry skills, and understand the other concepts covered. Here are some guiding points to help you assess each student.
Download Grading Rubric (364KB)
The student’s mastery of the subject matter is
- Excellent: Students use balanced compositions to present three views of their hole. They’ve labeled each hole with accurate measurements, and the design reveals an awareness of its real-world application and original thinking via its design or theme. The board is clean, neat, and well labeled.
- Good: Students present three views of their hole. They’ve labeled each hole with accurate measurements, and the design reveals an awareness of its real-world application or shows original thinking via its design or theme. They’ve labeled the board.
- Fair: Students present three views of their hole. They’ve labeled each hole with measurements, and the design reveals some awareness of previous discussions, but it is cliché or very simple. They’ve labeled the board, but not neatly or accurately (e.g., it has spelling errors).
- Poor: Students fail to present three views of their hole. They have not labeled each hole with measurements, and the design is not workable or is especially messy. They haven’t labeled the board or it’s bent, stained, or otherwise damaged.
Key Points
Break up this lesson into different working sessions in which students can develop and improve their boards. Encourage students to incorporate feedback into every step of the process.