8 Tips and Tricks to Redesign Your Classroom
A classroom designer walks you through the process of redesigning your room, with videos to inspire you.
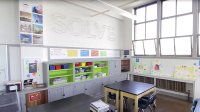
Editor’s Note: David Bill is a designer and educator who consulted with The Third Teacher+ on the Remake Your Class project highlighted in the videos below. We’re excited by the simplicity (and low price tag!) of this great redesign. The tips he presents here accompany the videos.
If you’re thinking of completing your own classroom remake project, good for you. I’ve been helping teachers redesign classroom spaces for the past several years and have seen this process work for projects of all sizes.
The tips below can be used for smaller scale remakes right way. If you want to do something bigger, you can start planning immediately and schedule some time over a holiday or long weekend. Either way, much of the prep work can be done now or incrementally over a few weeks as a lead-up to a larger remake project.
Whether you’re looking to reorganize one corner or redesign an entire room, here are eight tips that may help you throughout the process.
1. Getting Students Involved
Students are your primary users and should be at the center of such a remake process. To begin building excitement, reach out to them early and invite them to a weekend session at school (or someone’s garage) so they can be involved from the beginning. Here are some specific ways to involve students:
Visual inspiration: Ask parents, colleagues, or friends to donate a variety of appropriate magazines. Have students find and add magazine pictures to create a visual wall of spatial inspiration. The pictures can portray any space at all—not just schools. The goal is to include any and all places that stand out for students. When complete, have them use sticky dots to indicate the places that stand out and why. If you’re strapped for time, find and post the images yourself.
Digitally, you can use Pinterest to create a board of inspiration. As you or your students find items or spaces that stand out, they can be pinned to your board. Students then comment on the pins they appreciate.
Student-defined pain points: Is there anything unsatisfying about the present setup? To find out, use a whiteboard to draw a map of your current classroom, and visually identify the various sections. Students then use sticky notes to write a word or two that indicates how they feel or what types of actions take place in that section of the classroom.
10 x 10 x 10: With the students, define several questions that address your classroom remake project. Then have students talk with 10 different people in 10 different places and bring 10 different stories. Use that research to provide insights into what spaces people like and why.
Student helpers: Later, when you’re building out your redesign, ensure that the students play various roles in building the room. Whether it’s painting, putting casters on tables, or moving boxes, the more they are involved, the more ownership and pride they will take in the classroom.
2. Research and Brainstorming Methods
You don’t need to be a designer to engage in this process. All you need is the ability to conduct the research and do the brainstorming that is essential to this process. When remaking your classroom, the first step is to define the right need and then ask the right questions.
For example, when defining your need, you might ask, “How could we create more collaborative space in our classroom?” As you identify needs, activities like those mentioned below will help you collect data and then examine the challenge from a different perspective.
Word association: Place butcher paper on several tables. Break the participants into several groups, with each group at a separate table. Write a different random word in the center of each piece of butcher paper. Based upon that initial word, have the individuals write the first word that comes to their mind, and then repeat the process for each subsequent word. Do this for a few minutes. The table participants should then rotate and quickly build upon their group members’ words. Once that is completed, have the group select their two favorite words. Those two words must then be used to create a quick prototype that addresses the stated need.
Classroom flow: Find a colleague or student who has a free period when you teach, and ask him or her to come and observe how you and your students move about the classroom. Print a diagram of the classroom, and as your observer watches, have him or her draw where you and your students move. One color should be used for tracing your movement and another for the students’ movement. The sheet of paper with the tracking will help you determine what areas are used most heavily, and where items should be placed to better support fluid movement through your classroom.
Sticky notes: After conducting your initial research, determine the areas that need the most focus (e.g., clutter, collaborative space, and teacher work space). For each focal point, have participants draw or write an idea related to the topic on sticky note. The ideas should be posted on a whiteboard. When all the ideas are on the board, they should be sorted and grouped to determine which ideas overlap and which can move forward. These brainstorming rules and guidelines will be helpful in setting up such an experience.
3. Organizing and Managing Volunteers
When assigning tasks and responsibilities to your volunteers, use something very simple. If the individuals and groups helping you remake your classroom have regular online access, use a Google spreadsheet. If access is problematic, create a printable spreadsheet with the tasks and responsibilities, and pass it out to all parties involved in the project. The key to such a process is ensuring that it’s easy to identify and know who is handling each task and responsibility.
4. Clearing the Clutter
One of the keys to any classroom remake is removing all of the unnecessary items. Spend some time considering what you most frequently use and where those items should be in relation to where you spend most of your time while in class. Once you define those needs, begin to search sites like Lifehacker for tips on how to reorganize your materials.
5. Obtaining Supplies and Support
Once you’ve defined your required materials for the remake, reach out to locally owned stores and tell your story. In many cases, the owners may donate or discount certain supplies. And by the way, it wouldn’t hurt to bring a few of your students when you are making the ask.
If your project is going to require a bit more money, an Indiegogo campaign may be a viable option. Partner with some of the students and perhaps your media teacher to create a video that will draw in some interest and support.
6. Repurposing Materials You May Already Have
Many items in our classrooms and homes are sitting idle when they could easily be repurposed. Do you have old plastic containers from the grocery store, or milk crates, or old hardbound books? Use them as storage containers in your classroom. Have old CDs? Make them into art. Lacking inspiration? Again, Pinterest may be a great resource for how to reuse materials in your classroom. If you can’t find the types of materials you’re looking for to organize things, your town or city may have a group like SCRAP, Urban Ore, or Goodwill. Check out those locations, as they will have plenty of reused materials. Also, explore Craigslist, a veritable gold mine for used materials.
7. Organizing Your Tools
Organize your tools in groupings based upon usage and frequency of use. Consider using containers or boxes that you or you students can easily identify and access, as these will be two of your biggest concerns. Use some color and visual labels to ensure that the containers stand out. If there are doors on your cabinets, consider taking them off so that everyone can see the containers with ease.
8. Additional Resources
- School Architecture Projects: a series of schools built by the Danish architect Rosan Bosch
- Make Space: a book by Scott Dorley and Scott Witthoft of Stanford’s d.school
- An Informational Guide to Young Children’s Outdoor Play Spaces: a guide to designing play spaces that support the development of young children
- Classroom Architect
- Get Inspired: a resource bank for creating unique spaces, and a web page offering students and teachers the chance to outline their classroom floor plan
- Teaching in Spaces Research on Learning Spaces: ideas from Stanford professors on how they use learning spaces to enhance their teaching
- Learning Spaces Toolkit: a toolkit to help design and maintain 21st-century informal learning spaces from North Carolina State University
Learn more about San Francisco’s Roosevelt Middle School and the volunteers and organizations who participated in the Remake Your Class project.