Lesson 3: How to Build Golf Holes to Scale
Practice teamwork skills and estimation by having students lay out a life-size replica of their golf holes.
Download Lesson 3 (68KB)
Lesson Objectives and Materials
Objectives
- To practice teamwork, especially communication
- To use estimation and scale
- To use critical-thinking skills
Materials
- tape (duct, carpenter’s, or other tape depending on your floor’s surface)
- Nerf balls
- yardsticks
- rulers
- measuring devices
Engaging Students
Get your students interested in the lesson by asking them
- To look at others students’ sketches and find one complimentary thing to say about them
- To predict the challenges and differences between having sketched a hole on paper and laying one out to scale
- To brainstorm what makes for good teamwork, such as clear goals, clear communication, flexibility, compromise, and participation
Project Application: Laying the Green
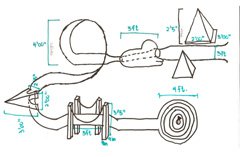
Ask students to create a life-size replication of each hole based on their sketches. Students will use tape to lay out the course on the classroom floor or outside. Before beginning, ask each student to choose his or her favorite rough sketch, and have them redraw it for clarity if necessary.
Have your students lay the green by asking them to follow these steps:
1. Pair up with another student.
2. Estimate how many inches, feet, centimeters, or meters each segment of the course will be based on each component of the hole. For example, they should measure the hole size in inches or centimeters and the green in meters or feet.
3. Discuss one or more of the following:
- Course plan: Which partner's hole gets laid out first and where
- Material management: Who manages which materials
- Challenges: What the team will do if it runs out of tape, room, or time
4. Use tape to lay out the course based on the predetermined design specifications. (See lesson 2 for more details.)
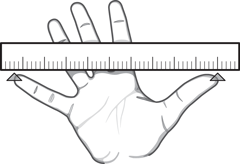
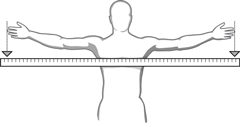
5. Make comparisons between estimations and actual measurements. Help students make practical estimations by using their:
- Hand as a small ruler: Ask students to stretch out their hands and measure the length from the tip of the thumb to the tip of the pinky.
- Wingspan as a larger ruler: Ask students to spread out their arms and measure from the tip of the longest finger on one hand to the tip of the longest finger on the other hand.
6. Play the holes with Nerf balls and yard sticks (or other readily available materials) and think about the pros and cons of each hole.
7. Record feedback about each hole from the group. Discuss the strengths and weaknesses by looking at the following features:
- Length: Is there enough room for the golf ball to gain momentum?
- Turns: If sharp, are there walls or banks for the ball to bounce off of?
- Ramps: Is the angle too sharp to allow for the ball to roll up?
- Hazards: Are there too many, creating player frustration, or are there not enough, resulting in a boring hole?
- Hole: Is the size appropriate to fit a golf ball? Is it placed properly?
- Spatial dimensions: Are there places for players to stand throughout the hole? Does it feel crowded?
- Overall fun: Is the course fun and engaging?
8. Use critiques from the previous step to help refine each hole. Ask students to improve their sketches based on student feedback.
Student Assessment
At the end of this lesson, you should have a good idea of each student’s ability to communicate effectively, work in teams, think critically, use estimates, and understand the other concepts covered. Here are some guiding points to help you assess each student.
The students’ mastery of the subject matter is
- Excellent: Students strike a balance in listening, talking, and doing. The students estimate distances well, creating a clean working floor model. Students provide and record a critique that shows awareness of geometry and practicality.
- Good: Students listen, talk, and do. Students estimate distances, creating a working floor model. Students provide and record a critique.
- Fair: Students do two of the three: listen, talk, do. Students fail to estimate distances or do so poorly. Students finish their floor model, but it is unplayable or messy. Students critique only the obvious.
- Poor: Students do not focus. Students play with the tape or use it inappropriately. Students do not take the critique seriously.
Key Points
Ask your school’s custodian about the proper tape to use on the floor. Some tape can be difficult to clean up depending on the floor’s surface. Duct tape is especially cumbersome on slick surfaces.