Teaching Physics with Felt
Just recently, I was lucky enough to attend a "Sewing with Circuits" workshop run by The Hacktory, a local Philadelphia maker community focused on education and creation. (On a side note, they are located within the collaborative space rightfully named "The Department of Making and Doing.") It was Saturday night and an email caught my attention about a workshop on Sunday. I had nothing else to do, so I dropped the $45.
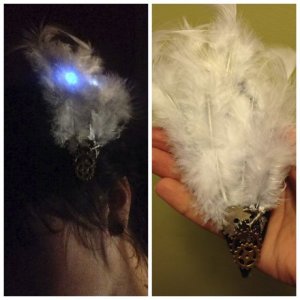
I arrived at the class with my sewing kit, some fabric and feathers, and a lot of excitement. On the table in front of me were a small circular chip, some alligator clips, conductive thread and an instructional packet. There was also a table of felt, pipe cleaners, beads and more. Over the next couple of hours, we learned about best practices when working with conductive thread, how to plan out our circuit, and how to plan for fitting all of the components into our design. I had made my own "fascinator" (a fancy hairclip) for my wedding, so I wanted to make one that lit up. Once we had our plan drawn out, we were given three LEDs to work with. Yes, we were going to light up three separate LEDs with a battery, a Lilypad Twinkle Board and conductive thread. By connecting our LEDs to the board, we could make them flash and pulse.
Before we started sewing, we used the alligator clips to test our circuits and make sure they worked. Even though I've lit up a ton of light bulbs with wire and batteries, there was still that small feeling of joy seeing the LEDs light up, especially when I connected them through the Lilypad board and watched them flash and pulse. I didn't actually finish my project that day, but I was very excited to do so.
Learning by Doing
Fast forward one week, and I'm sitting at my dining room table attempting to get my LEDs to light up. Over a two-hour period, I’m pretty sure I end up sewing and re-sewing the project at least three times. Eventually, I have to take the whole thing apart to start from scratch. I also go online to order myself more conductive thread and a tiny power switch so I can turn the lights on and off.
Fast forward a few more weeks. The thread and the switch have arrived, and I'm now up at my parents' house in New York with the goal of finishing the circuit. I sit down with my brother, who studies engineering and runs wiring in houses with my father, to figure out how to get the LEDs to connect in a way that I can use the switch to control them all. (I had them set up in a parallel circuit so that one loop wouldn't have been connected to the switch.) We diagram it over and over again until we finally get a layout that works with the teardrop shape of my project. After 30 to 40 minutes of planning, I'm off and sewing.
Fast forward an hour or so, and I have sewed and re-sewed my circuit at least three times. Once I sewed the wrong ends of an LED to the battery, once I connected the wrong end of an LED to the Lilypad, and once I put an LED on the wrong side of the piece of felt. Finally . . . success!! I turn the switch and the lights burn brightly. The best part is, I really understand why everything is working correctly this time.
So Where is the Physics in This, You Ask?
As I reflect on the process, I see lots of applications for the physics classroom:
- The obvious connection is, of course, the circuitry. Rather than using a pre-bought kit or drawing schematic diagrams, kids can learn through a short lesson, designing a plan, and then through trial and error. This makes the learning more "sticky."
- More advanced users can add more components and thereby have the opportunity to show their understanding of more complex concepts. This is an easy way to differentiate the classroom.
- Students can take their creations home with them to use in their everyday life. This is the perfect way to show that physics is not just a subject in school -- it's all around us.
- By adding a creative edge to circuitry and asking students to create circuits in a new way, all students are put on a fairly level playing field, allowing for them to learn from each other and providing opportunities for new "experts" to emerge.
Science is best taught in a hands-on manner. For around $10 per student (plus fabric or other materials), they can create wearable circuits that will teach them not only about how circuits work, but also the fine motor skills involved in sewing, the planning skills associated with creating schematic diagrams, and the challenge of planning out more intricate circuits.
Want to Sew with Circuits?
Here are some resources to get you started:
- Find E-Textiles products on SparkFun.
- Check out Adafruit E-Textiles Materials.
- Learn how to make E-Textiles on the Adafruit YouTube Channel.
- Look for a Makerspace near you that offers workshops.