Great Displays in the Great Outdoors: Bringing Student Work to Life
With the help of ceramics and QR codes, a student research project leaves the building for all to enjoy outside on the school grounds.
Why should your classroom walls be the only place to display your students' work? While it might not be the best season for this where you are right now, once weather permits, the great outdoors can prove to be a great display area for your projects! As the ninth grade humanities teacher of a completely project-based curriculum called MPX at Mid-Pacific Institute in Honolulu, I always have more student project work than I do display space. And because MPX fulfills the requirements for both Social Studies and Language Arts, there's a lot of student project work to display.
My colleagues and I have found that displaying our students’ work brings a sense of pride and ownership to all they do. One of my mentors, Laura McBain from High Tech High, once asked my colleagues and me to take a walk around our campus and look for all of the places that we could display student work. I was dreaming about a World War II "timeline" project for my students, but wondered where I could stage such an exhibit. Then I looked out of my classroom window, and there it was -- a grassy area next to an asphalt pathway connecting two buildings on campus. I knew right then that I could concoct an outdoor exhibit for my students' timeline, which I will explain below.
Don't let the great outdoors scare you! Student work on picnic table tops under plexiglass, mounted on or hanging from the ceilings of pedestrian walkways, as pennants on flagpoles, or mosaics on the vertical parts of exterior stairs -- these are just a few options that educators can consider as outdoor exhibition spaces.
A Weather-Proof Research Project
Before I could display my students' work outdoors, the timeline project needed to come to fruition. The project steps were as follows:
- Give students basic knowledge of WWII.
- Allow them to choose a specific WWII event to research.
- Require them to create an MLA-formatted "works cited" page.
- Allow them to choose a person associated with their chosen WWII event.
- Assign an outline and rough draft of the chosen event through the chosen person’s point of view.
- Hold a peer feedback session and require students to make revisions.
- Give them basic knowledge of working with clay or ceramics.
- Assign a finalized draft including MLA-formatted citations.
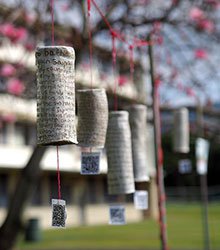
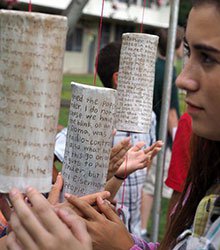
- Guide students in creating a ceramic cylinder engraved with their finalized draft.
- Require them to create a QR code linking to our class' timeline website.
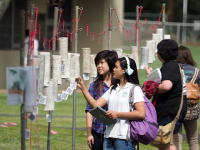
- Assemble the outdoor ceramic biographical timeline, and invite an audience.
- Require students to write a reflection essay on their learning experience.
Click here to download a PDF of our project sheet. You can also visit the corresponding website for the outdoor biographical WWII timeline. Here you'll find more photos of the outdoor display, as well as the content that our ninth grade students were able to tackle through project-based learning rather than textbook-directed learning.
Student Engagement and Peer Feedback
The People of World War II Timeline project was a way for me to bring history to life for my high school freshmen. Learning WWII history through a textbook can be quite dry for a teenager's way of thinking. I decided to hook my students into the topic through allowing them some choice with what they wanted to research. Then, by writing about a historical event through the eyes of a person involved in it, the students were able to absorb empathy as well as retain the content. Student Cami Kai wrote:
Every time another history class visited the timeline outside, my students would point out of our classroom window, proud that their work was being examined by someone other than their teacher. By incorporating QR codes into the outdoor display, they were able to read the digital comments shared by visitors. Since my students couldn’t be outside all day and every day with their work, the digital comments helped them gain feedback on their projects.
If the season isn't cooperating enough for a truly outdoor display, consider the sheltered areas on your campus. Cafeteria walls can host extra-large artwork. Conference rooms can be cleared of their chairs to host a student-work gallery after school. Large-paned windows in a technology center can easily be converted into a canvas for student’s products. Even bathroom stalls (provided the work displayed is a copy, not an original) will guarantee exposure to the masses. The great outdoors can make great displays!
How have you used outdoor spaces at your school for student projects?